Wednesday, September 4, 2013

How to create a Eclipse plugin wizard page part 2

How To Capture Keyboard Event in the plug-in wizard


Next lets see how to get what user input in the text box.
To that we need to put key Listener.

        host.addKeyListener(new KeyListener() {

            @Override
            public void keyPressed(KeyEvent e) {
            }

            @Override
            public void keyReleased(KeyEvent e) {
                if (!host.getText().isEmpty()) {
                    setPageComplete(true);

                }
            }

        });
 

We can attach a KeyListener() or KeyAdapter() to a widget control to keep track the keyboard event.

Adds the listener to the collection of listeners who will be notified when keys are pressed and released  on the system keyboard, by sending it one of the messages defined in the KeyListener interface.


we can use the getText() method to o get the what the user has enterd.

public String getText1() {
        return host.getText();
    }


And after we need to add the page to the wizard. Wizard is invoked by when we call the addpages() method.Here I have given a parameter user_select_value.It is not necessary to do that.Create a new instance of the wizard page and then add it to the list of pages.
      
          RS_wizard_page1 one;
        one = new RS_wizard_page1(user_select_value);
        wizard.addPage(one); 


Friday, August 30, 2013

How to create a Eclipse plugin wizard page part 1

To create a Plugon wizard you need to first create a temple for your page.
This class can be extended from the class WizardPage.  An abstract base implementation of a wizard page. We can use the following  methods to configure the wizard page:

  •     setDescription
  •     setErrorMessage
  •     setImageDescriptor
  •     setMessage
  •     setPageComplete
  •     setPreviousPage
  •     setTitle


You can get more information about these methods from here.
This is my page template let see what each of these code segmants do.

class RS_wizard_page1 extends WizardPage {
   
    private Text host;
    private Text port;
    private Text path;
    public String server_url;
    private Composite container;
    private Object user_select_value;
    String[][] Value_ecg_providers;
   
        public RS_wizard_page1(Object user_select_value ) {
        super("Hello Remote Service Host");
        this.user_select_value = user_select_value;
        setTitle("Hello Remote Service Host");
        setDescription("Enter data for your server");   
       
    }

    @Override
    public void createControl(Composite parent) {
       
        container = new Composite(parent, SWT.NONE);
        GridLayout layout = new GridLayout();
        container.setLayout(new GridLayout(1,false));
        layout.numColumns = 1;
         
         
        Label example = new Label(container, SWT.NONE);       
        example.setText("Example             ecftcp://localhost:3282/server");

       
        Label Host = new Label(container, SWT.NONE);
        Host.setText("Host");
        host = new Text(container, SWT.BORDER | SWT.SINGLE);
        host.setText("");
       
        Label Port = new Label(container, SWT.NONE);
        Port.setText("Port");
        port = new Text(container, SWT.BORDER| SWT.SINGLE);
        port.setText("");
       
        Label Path = new Label(container, SWT.NONE);       
        Path.setText("Path");
        path = new Text(container, SWT.BORDER| SWT.SINGLE);
        path.setText("");


        host.addKeyListener(new KeyListener() {

            @Override
            public void keyPressed(KeyEvent e) {
            }

            @Override
            public void keyReleased(KeyEvent e) {
                if (!host.getText().isEmpty()) {
                    setPageComplete(true);

                }
            }

        });
       
        port.addKeyListener(new KeyListener() {
           
            @Override
            public void keyReleased(KeyEvent e) {           
               
            }
           
            @Override
            public void keyPressed(KeyEvent e) {
                if (!port.getText().isEmpty()) {
                    setPageComplete(true);

                }
               
            }
        });
       
        path.addKeyListener(new KeyListener() {
           
            @Override
            public void keyReleased(KeyEvent e) {
                               
            }
           
            @Override
            public void keyPressed(KeyEvent e) {
                if (!path.getText().isEmpty()) {
                    setPageComplete(true);

                }
            }
        });
       
       
        GridData gd = new GridData(GridData.FILL_HORIZONTAL);
        host.setLayoutData(gd);
        port.setLayoutData(gd);
        path.setLayoutData(gd);
        // Required to avoid an error in the system
        setControl(container);
        setPageComplete(false);

    }

    public String getText1() {
        return host.getText();
    }

    public String getText2() {
        return port.getText();
    }

    public String getText3() {
        return path.getText();
    }
//to get the full server url
    public String getServer_url() {
        return server_url;
    }

    public void setServer_url(String server_url) {
        this.server_url = server_url;
        server_url= getText1()+getText2()+getText3();
    }
   
    @Override
    public IWizardPage getNextPage() {
        // TODO Auto-generated method stub
        return super.getNextPage();
    }


}


From the following part we set the page title,description of the page

        super("Hello Remote Service Host");
        this.user_select_value = user_select_value;
        setTitle("Hello Remote Service Host");
        setDescription("Enter data for your server");   


Then we need to configure the layout of the page.I have done it in the following way.

        container = new Composite(parent, SWT.NONE);
        GridLayout layout = new GridLayout();
        container.setLayout(new GridLayout(1,false));
        layout.numColumns = 1;


Frist I have create a new  container. This new instance of this class given its parent and a style value describing its behavior and appearance.

Then I have created a new layout. which controls children of a Composite in a grid. GridLayout has a number of configuration fields, and the controls it lays out can have an associated  layout data object, called GridData.

Because I need only  one column i have set the numColumns to one. 


How to put a label in the page  


We can create a new label  and have  include the parent a composite control which will be the parent of the new instance(in our case it is container ) and this cannot be null  and the style we need for the labe control to construct. In here I have put it has none
         Label Host = new Label(container, SWT.NONE);


Then we can say what does the label need have say by simpley invoking the method setText.

        Host.setText("Host");


Then we create a new  instance of this class given with the parent and a style value describing its behavior and  appearance.

        host = new Text(container, SWT.BORDER | SWT.SINGLE);


Wednesday, August 21, 2013

How create and retrieve all 2D array data from Java propertie file in a Eclipse Project.

In this project I needed to have a 2D array. Which had the information about the items that I needed to be put in a combo box.
It can be easely done by creating a 2D array in the code. But hard coding that kind of information is not good programming practice therefore I decided to create a property file which had that information.
If the user want to change what is in the drop down meneu he can easily do it by changing the property file that is the advantage of having a property file.


How to add Property file 

In the package explorer, right-click on the package and select New -> File, then enter the filename including the ".properties" suffix.


How to create a 2D array in property file.

To do that you can use the following syntax.

ecf_providers=0,ECF Generic;1,r-OSGi;2,ecf.generic.server;3,ecf.filetransfer.bittorrent;\
4,ecf.msn.msnp;5,ecf.discovery.jslp;6,ecf.msn.msnp;7,ecf.xmpp.smack;


I have put  "\" at the end of the first line to make sure that all the array data will be retrieved when the the method in the code uses the property file otherwise only the first line will be read form the property file. Another way to do is write the array as a single line like this.

ecf_providers=0,ECF Generic;1,r-OSGi;2,ecf.generic.server;3,ecf.filetransfer.bittorrent;4,ecf.msn.msnp;5,ecf.discovery.jslp; 


Retrieve all 2D array data from Java properties file.

To get data from the property file and store it in a 2D array you can use the following two methods.

What this methods do is they one method read the data from the property file and the other method store that data in a array called Value_ecg_providers.


To read the data from the property file you can use a method like this.

    private static String[][] fetchArrayFromPropFile(String propertyName,
            Properties propFile) {
        String[] a = propFile.getProperty(propertyName).split(";");
        String[][] array = new String[a.length][a.length];
        for (int i = 0; i < a.length; i++) {
            array[i] = a[i].split(",");
        }
        return array;
    }


try {
            providers.load(RemoteServiceConsumerExample1Template.class
                    .getClassLoader().getResourceAsStream(
                            "providers.properties"));
            Value_ecg_providers = fetchArrayFromPropFile("ecf_providers",
                    providers);

        } catch (FileNotFoundException e) {
            System.out.print("Property file not found");
           
            e.printStackTrace();
        } catch (IOException e) {
            /
            e.printStackTrace();
        }

    } 

 Had to use the  <RemoteServiceConsumerExample1Template.class
                                    .getClassLoader().getResourceAsStream(
                            "providers.properties"))
>

 because I am loading the file from classpath.

If you need to load a properties file from the file system and retrieved the property value you can simple use something like this.


public class Test
{
    public static void main( String[] args )
    {
        Properties property = new Properties();

        try {
            //set the properties value

          
              property.setProperty("database", "localhost"); 
              property.setProperty("ABC", "CSE");        
              property.setProperty("letter ", "A");

            //save properties to project root folder
            prop.store(new FileOutputStream("config.properties"), null);

        } catch (IOException ex) {
            ex.printStackTrace();
        }
    }
}


Thursday, July 25, 2013

ECF Plug-in Development -Part 2


Before you can run an exiting ECF project you need to have set ECF in your target platform.In this case I am trying to run OSGi Remote Service Host Example .If you haven not set the ECF in the target platform for the workspace you will be getting some errors like this.Even though you will not see these errors until you try to run the example.


     org.eclipse.ecf.examples.remoteservices.hello,
     org.eclipse.ecf.osgi.services.distribution,
     org.eclipse.ecf.remoteservice

 Install the ECF SDK into Eclipse

Go to Help> Install New Software
In the new window click the the Add button on the right.
And type ECF for the name put the following url for the Location field.

 http://download.eclipse.org/rt/ecf/3.6.1/site.p2 


Select the Eclipse Communication Framework (ECF) check box. And click next.
And ECF SDK will be installed.

After that 
Goto Window>Preferences>Plugin Development>Target Platform.
And. ECF Remote Services to the active target platform.


WARNING: Port 9278 already in use. This instance of R-OSGi is running on port 9279


 If you get an error when trying run an OSGi example or a project way to resolve this is to use the disable R-OSGi when you start the eclipse.


 You can do it by using the following command.

./eclipse -vmargs -Dch.ethz.iks.r_osgi.registerDefaultChannel=false


You can learn more about ECF OSGi Remote Services from this link.


Tuesday, July 16, 2013

Useful software Ubuntu

System Load  Indicator


This will add the CPU, RAM, Network and HDD usage meters to the taskbar so user can quickly get an idea about the system.We can see more detailed information about the system as well from the system monitor window.

Add the repository by typing the following line in terminal
sudo add-apt-repository ppa:indicator-multiload/stable-daily
To update and to install run the following two commands.
sudo apt-get update
sudo apt-get install indicator-multiload

Or you can download it from the software center.


Xfburn-CD/DVD burning tool

This is useful for creating CDs and DVDs from files on your computer or ISO images downloaded from elsewhere.You can install it from software center or run the following command in the terminal.

sudo apt-get install xfburn


KSnapshot

KSnapshot is a simple applet for taking screenshots. It is capable of capturing images of either the whole desktop, or just a single window. The images can then be saved, or passed to another application using drag and drop.

sudo apt-get install ksnapshot


Saturday, June 29, 2013

Eclipse Plug-in Development


To develop Eclipse you need the Eclipse plug in development tools.There are two ways to get these tools.

1)You can download the Eclipse Classic which has the necessary tools.
         
      Download the suitable  Eclipse classic for your OS  from this link.
      And extract it.

2)You can update your existing Eclipse JAVA IDE.
  
      Go to Help=>Install New Software and select the site.In this case it is
      Helios - http://download.eclipse.org/releases/helios
      Then select General Purpose Tools. Under this category you will
      Eclipse plug-in Development Environment. Install it.


How to import an exiting Eclipse plug-in project.

Here I am going to import a plug-in  called  PDE template for creating a remote service.Which can be located here. I am entering the data which is suitable for this project.

Go to File=>Import=>General=>Exiting Project.Then Select the directory of the project.Click finish.


After this project is imported it showed some errors.These errors were occured due to some missing packages you can fix them by adding those packages.


You can easily add those packages by moving you mouse to the underlined area and selecting the option "add" from the drop down menu.


After adding those packages all the errors except one.


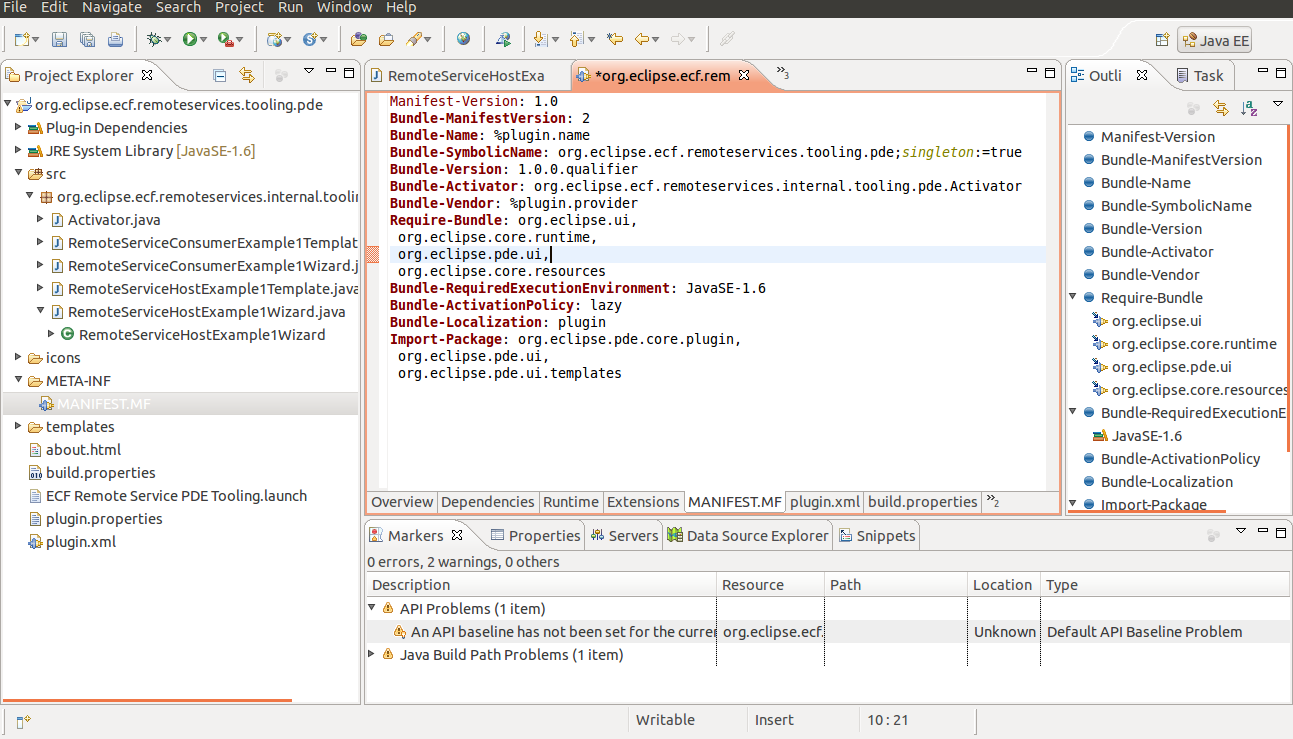
To fix this we need to edit the MANIFEST.MF file.
http://en.wikipedia.org/wiki/Manifest_file
Problem here is that the required version mentioned in the MANIFEST.MF file can not be found.There for I removed the specific bundle version line.So the plug-in will work with the default bundle version available.


     before editing
 
   after editing 

After editing you have to save the MANIFEST.MF file by pressing ctrl+s.
After this you can see that all the errors have gone.


How to Run a Eclipse Plug-in project

To test a Eclipse plug-in you have to run it as Eclipse Application.To that go to 
Run=>Run Configuration and select Eclipse Application.


To create a new configuration click the icon for creating a new configuration.
Then go the plug-in tab of the new configuration window and and select the plug-in you need to run in this case I am running "remote service" plug-in.


After that click run and you will see that new eclipse will launch will with the plug-in you developed.


Wednesday, June 26, 2013

Working with GitHub

How to install and configure  GitHub on Ubuntu


Installing  GitHub in ubuntu is very easy.
open terminal and run the following command.
sudo apt-get install git


How to configure GitHub

The first thing you should do when you install Git is to set your user name and e-mail address.To do that enter the following two lines in the terminal.

git config --global user.name "John Doe" # Sets the default name for git to use when you commit

git config --global user.email johndoe@example.com
# Sets the default email for git to use when you commit

to check your setting use the following command.
git config --list


Fork and Clone an Existing Repository

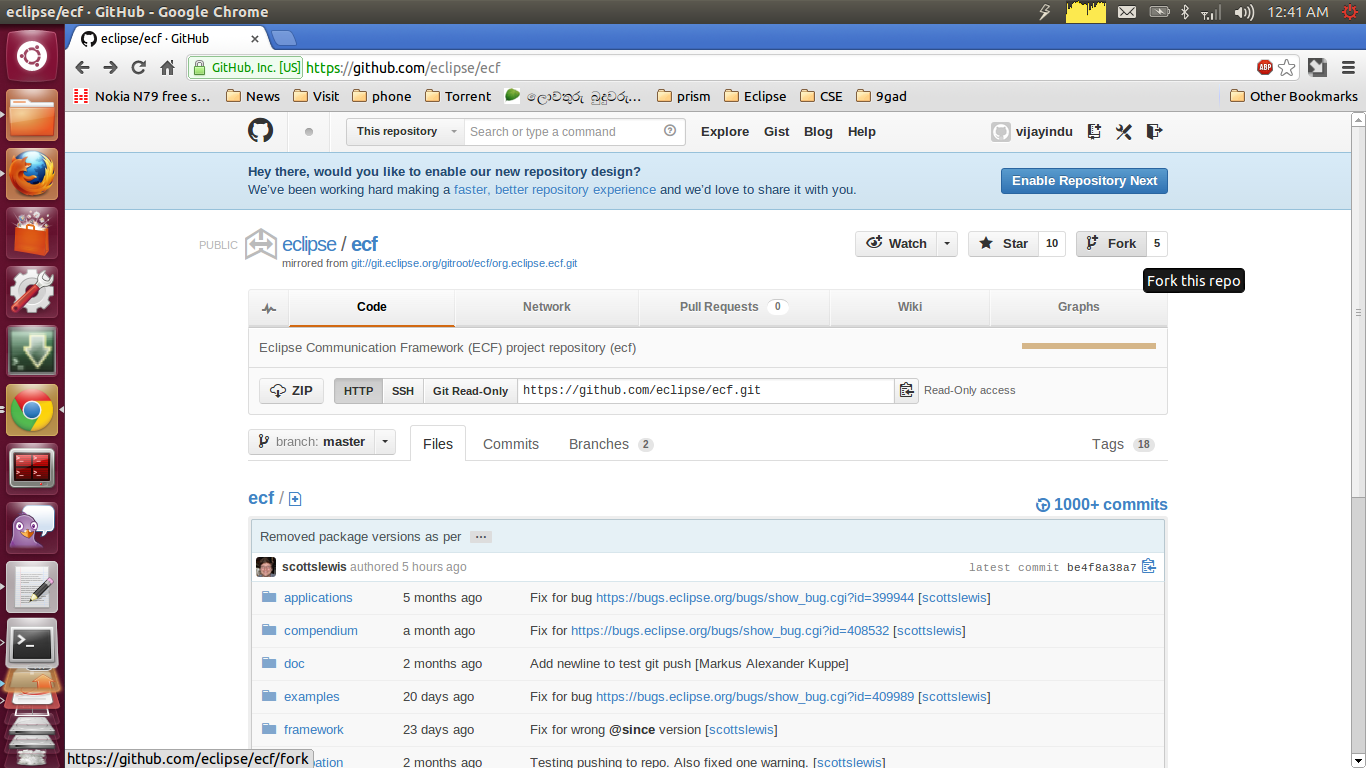
When you need work  on a project page that looks interesting  you can click the “fork” button in the project header to have GitHub copy that project to your user so you can push to it.
To fork a project, visit the project page (in this case,https://github.com/eclipse/ecf) and click
the “fork” button in the header. After a few seconds, you’re taken to your new project page, which indicates that this project is a fork of another one.

After you have fork the project,if you want to get a copy of an existing Git repository the command you need is git clone.

git clone https://github.com/vijayindu/ecf.git
#replace vijayindu with your user name.


this will clone the existing repository to your current working directory of your computer.


Tuesday, June 25, 2013

How to install Maven in Ubuntu

In a terminal(alt+ctrl+t)
type
apt-cache search maven
to get all the available Maven package.


To install maven type
sudo apt-get install maven
in terminal


Type
mvn -version
in your terminal to verify your installation.


You have successfully installed maven.


Install Eclipse,Java and setting variables in Ubuntu

To install Eclipse in Ubuntu first you have to download it from the Eclipse web site.
Here I am installing  Eclipse Juno (4.2)  Eclipse IDE for Java EE Developers Eclipse Juno (4.2)

You can download it from here.


After downloading the file you can you can open it with archive manger and and extract it where you want.


After that you can start using eclipse.

How To Install JDK On Ubuntu

Open terminal by pressing alt+ctrl+t .
Type
apt-cache search openjdk
To search all the available Openjdk version.


Here I am going to install open JDK 7

Type 
sudo apt-get install openjdk-7-jdk
in terminal to install open JDK 7

To verify the installation type
java -version
in terminal


How to set JAVA_HOME for OpenJDK


Type
nano ~/.bashrc
in the terminal to open the .bashrc and edit it.At the end of the file add the following line
export JAVA_HOME=/usr/lib/jvm/java-7-openjdk-amd64/


and press ctrl+o and then press enter to save the file.


To verify the java home type
echo $JAVA_HOME

in the terminal


Friday, May 17, 2013

GSoC 2013 Proposal PDE templates of OSGi remote services


Short description: The current Plug-in Development Environment (PDE) provides tools to create, develop, test, debug, build and deploy Eclipse plug-ins etc.This project focuses on creating a new template related with OSGi remote services which is compatible with the current PDE.

The PDE provides several templates for developing plugins.This projects focuses on  creating a PDE template of OSGi remote services with specific distribution providers and specifications.And the related documentation to the project.

Detailed Information

This project will develop  the new template to the existing  plugins development  wizard and will support existing wizard. 


a71


Users will be able access the newly developed template through the wizard and the short description will be shown.


According to the specifications and the design of the OSGi remote service users will be able do the necessary changes.And the design will be similar to the existing GUI.


The ability to create a plug-in with a ready-to-run extension is appealing, particularly to novice Eclipse developers. Therefore,creating a template to be added to the  for Eclipse's more popular templates  during the plug-in project creation process will be a benefit to developers. 

Background
In the time leading up to the start of the GSoC programme I am going to improve my knowledge about Eclipse Communication Framework . And my major goal is to get familiar with the OSGi Remote Services and Plug-in Development Environment.And thoroughly study the source code for existing PDE template for creating a remote service.To improve my knowledge on above aspects I expect to read the documents regarding them and to have a discussion with the project mentors.  

Deliverables
Working template in PDE which is related to OSGi Remote service.


Schedule 

April 25 - May 2:
Familiarize with ECF
Study the documentation about PDE OSGi


May 3 - June 16
Try out existing plugging development templates
Research about PDE.
Research about OSGi
Get more familiar with ECF


June 17 - July 20
Discuss and design a OSGi remote service
Start coding to integrate designed service
Start working  on GUI
Testing


July 20-August 2
Mid term Evaluation


August 2 - September 5
Add required new classes and update existing classes which requires to add OSGi Remote service.
Further develop the GUI and integrate it with the code
Integrate all implemented parts eclipse single project.


September 5- September 16
Test if added new functionality and old functionality is working properly.
Do the required changes to fix the bugs.


September 16- September 21
Documentation


September 21 - September 23
Finish project and Submit Deliverable


Expectations

I hope to  discussion with my mentors about the idea which will help to reduce the ambiguity of the requirements.

I am going to put effort and do my best to understand but if I am unable to do so I would like to get help from the mentors clarify things that  I do not understand about PDE and OSGI.


Contact Information

Email: svijayindu@gmail.com

Phone number: +94718082232

Time-zone: GMT+5:30


I’m Suneth Vijayindu Walliwala Gamage. I am a third year  undergraduate in Department of Computer Science and Engineering in University of Moratuwa, Sri Lanka.Which has consecutively won GSOC’s most number of participant’s award since 2009 to 2012.I have much experience in java and developing various applications, basically I am doing programming with Java therefor I have a advance knowledge with programming in Java also I have experience with programming in  C,C++ and XML.I have implemented many projects in java including a one which spanned for four months.Also I was a project team member of the following  projects which were conducted by our department.

Patient Management System : for Base Hospital, Homagama [1]

Sheersha Yathra : Wheelchair for a Quadriplegic [2]

I am able to work 50 hours a week  for GSoC from June to September( 6 hours on weekdays and 10 hours on weekends).So I’m confident enough to take up this project as I have the required skill set for this project and I will deliver my best to make this project a success.`And I would like continue  forward the work for ECF even after GSoC finishes and to complete the work all the way to deployment.

http://www.uomcseprojects.blogspot.com/2012/06/patient-management-system-for-base.htm

http://uomcseprojects.blogspot.com/2012/08/sheersha-yathra-wheelchair-for_8.html


Thursday, March 1, 2012

HttpUnit

Introduction 
Testing programs is a boring thing.It takes lot of time and efforts to do that
but there are easier ways to do that by automated software one such great software is HttpUnit.
HttpUnit is an open source software testing framework used to perform testing of web sites without the need for a web browser.
HttpUnit is primarily designed for "black-box" testing of web sites.
HttpUnit is free software available from HttpUnitSite that implements several useful unit testing methods together with classes for connecting to HTTP servers, processing HTML, and maintaining stateful sessions.

HttpUnit supports :

  • HTML form submission
  • JavaScript
  • automatic page redirection and cookies.
  • Written in Java, HttpUnit allows Java test code to process returned pages as text, XML DOM, or containers of forms, tables and links
It is well suited to be used in combination with JUnit.It easily write tests that verify the proper behaviour of a web site.The use of HttpUnit allows for automated testing of web applications.

The center of HttpUnit is the WebConversation class, which takes the place of a browser talking to a single site.It is responsible for maintaining session context, which it does via cookies returned by the server.To use it, one must create a request and ask the WebConversation for a response.

Some Drawbacks to HTTPUnit:
  • Tests are tied to page structures.
  • If you change your page (say, reordering links or forms), you will break your tests.
  • Test assertions typically depend on the content of the page.
  • If content changes, tests may break.
  • Checking content is not completely sufficient for testing Grid portals.

Setting HttpUnit in Oracle JDeveloper

One way to test Web application is with HttpUnit framework that is based on Junit. One nice thing about JDeveloper is that because of the built-in support for JUnit you also get a nice HttpUnit testing environment.
Here are the steps to follow.

1. Download HttpUnit and extract it to your drive.

2. In JDeveloper take your Web project and go into project properties->libraries. Click the "Add JAR" button and add the files from the lib and jars directory.


3. Create a new JUnit test case class:


4. Run your test:


5. View the results:


6. If you have errors double click the row in the JUnit log window to jump to the actual test code that failed.